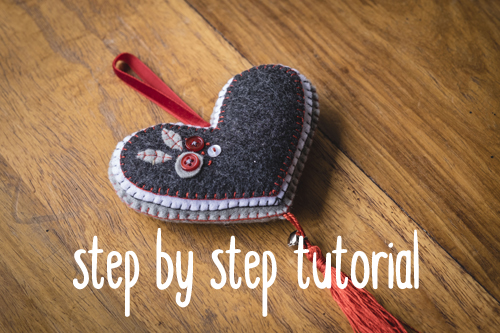
Christmas with Heart - make your own Christmas Heart
Posted by Sarah Massey-Hicks - Dec 1, 2015
Is there anything better than receiving a handmade gift? Even if it is just something small, the fact that someone has gone to the trouble of making something for me, always makes me smile.
Especially this time of the year, something handmade, feels more like Christmas to me.
I am going to show you how to make a really simple little heart shaped Christmas decoration. This is something you can even rope your kids into. I think they make perfect end of year gifts for teachers, so much better than another hand cream. Or you can even use them to zshoozsh up your Christmas wrapping. The possibilities are endless.
What you will need:
- Small bits of felt, in your colours of choice
- Tiny buttons, sequins, beads (any bits and bobs you want to use to decorate your little hearts with)
- 15cm of Narrow ribbon or braid (this is used for hanging the hearts
- Tiny bit of stuffing
- Embroidery thread to compliment your felt
- Hand sewing needle
- Optional extras: bells or tassels
- Paper, pencil, ruler, scissors (fabric and paper), pins
STEP 1: Your first job when making any kind of sewing project is making the pattern. Lucky for us, this is a very simple pattern. All you need is 3 hearts. Start with your biggest heart, this needs to be the size you would like your finished decoration. You can draw this template on your piece of paper, and cut it out. Then your medium size will be 5mm smaller than this, and the smallest heart, will be 5mm smaller than your medium heart. You should now have 3 paper heart templates.
STEP 2: Cut out your felt using the templates you just made. You will need 4 hearts cut out of felt, 2 big, one medium, and 1 small, in contrasting colours.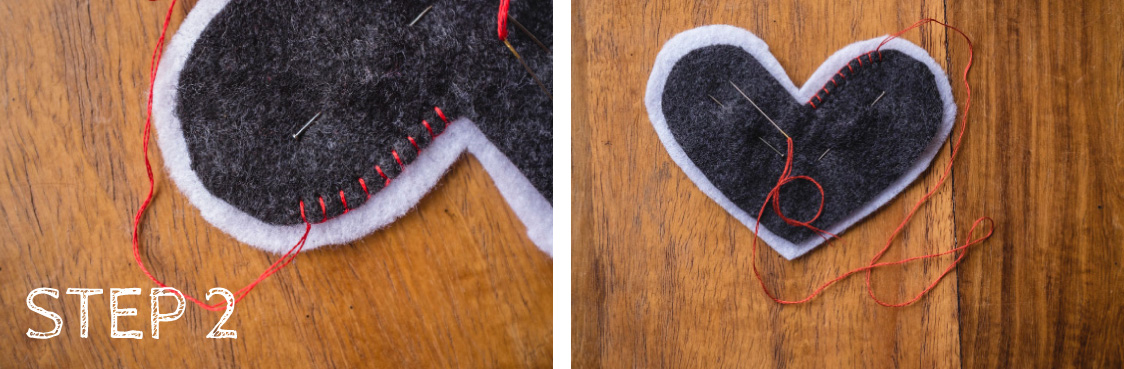
Now comes the fun part! Sew your little heart to your medium sized heart. It will save you some heart ache if you take the trouble to pin them together. You can either use a running stitch or a blanket stitch to do this, it is totally up to you. When doing this kind of stitching, I like to use 2 strands of embroidery thread. Because it is a little thicker, it gives a nice decorative finish.
STEP 3: Now that the 2 hearts are attached, you can go ahead and decorate your top heart. You can use little buttons, sequins, beads, off cuts of felt, little bits of embroidery anything your heart desires. When sewing on tiny bits of felt, I prefer to use a single strand of embroidery thread, as 2 are very thick and tend to tear up the little pieces of felt. Once you are happy with the result, you will stitch your first 2 layers to your big heart, again using blanket stitch or running stitch.
STEP 4: Once that is done, you need to prepare your finishing touches. I love bells at Christmas time, they always feel magical, so I have included some bells and a tassel onto my little heart. I did this by threading the loop of the tassel though the eye of a bell. 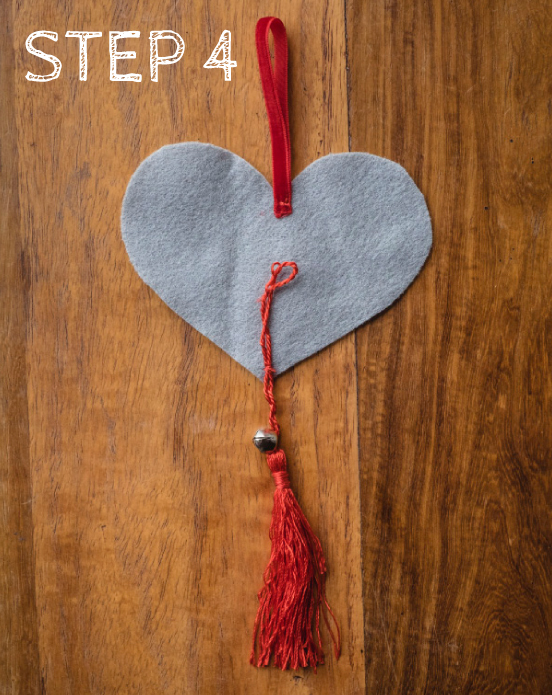
Now cut your 15cm length of ribbon for hanging your decoration. The ribbon and the tassel you will stitch onto the wrong side of the other big heart, Either using a sewing machine or by hand. The ribbon will go at the top of the heart, and the tassel will be sewn at the point of the heart.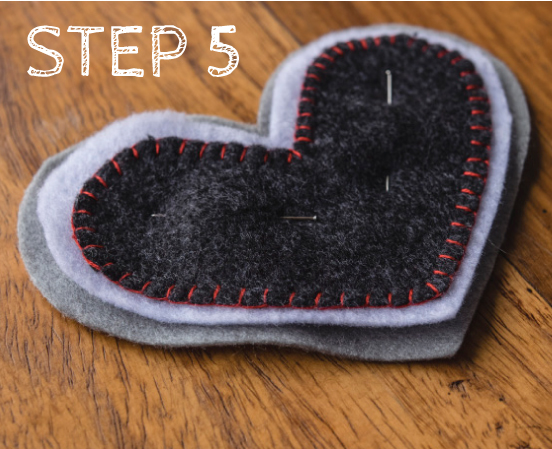
STEP 5: Now pin your 2 big hearts together and sew them together, using your chosen method, leave a little gap, so that you can stuff your heart. A little tip when it comes to stuffing is to stuff into the furthest corners from the gap first, and stuff into all the little points and curves off your heart. Once your heart is stuffed, you can close your gap.
Voila, you have a beautiful handmade Christmas decoration! And the best part is, you can take this basic idea and run with it, why not instead of hearts, make stars, Or Christmas baubles, or even Christmas trees. Let your Christmas spirit out and go wild!
December 2015 | Comments | 1 Love | Activities

about the author
A mama, a maker and a lover of beautiful things.
I am the founder and one half of the creative brain behind the ever growing Port Elizabeth based kiddies’ brand, Myang, and I am extremely chuffed to be writing this blog for The Little Pages.
I like to think of myself as a creative mama, and in this blog I would like to share some of these and other adventures with you. My husband and I are both proudly born and bred in the Friendly City and the proud parents of two glorious little girls…the effervescent and gorgeous Princess Olivia as well as her younger sister, the rambunctious and delicious Miss Adia. We live in a gingerbread-esque house with Rosie, our death defying Houdini of a hound and Loki, our ever patient cat. Our household is in a constant state of chaos, full of noise, love, music, food, wine, friends, family, sewing, reading, gardening and JOY! We would not want it any other way.
popular posts
Mar 14, 2016
Ilze is mom to six year old Ceri and five year old Trace who has Down Syndrome. This single, working mom says that her mothering journey has...
Mar 23, 2015
We are super excited to share our first Mom of the Month feature with our readers. Kelly is a beautiful, inspiring mom who is full of joy and an...
Mar 24, 2015
Welcome to My Mama Made It! Thank you for taking the time out of your busy day to read the musings of a creative mom, wife, and entrepreneur.